
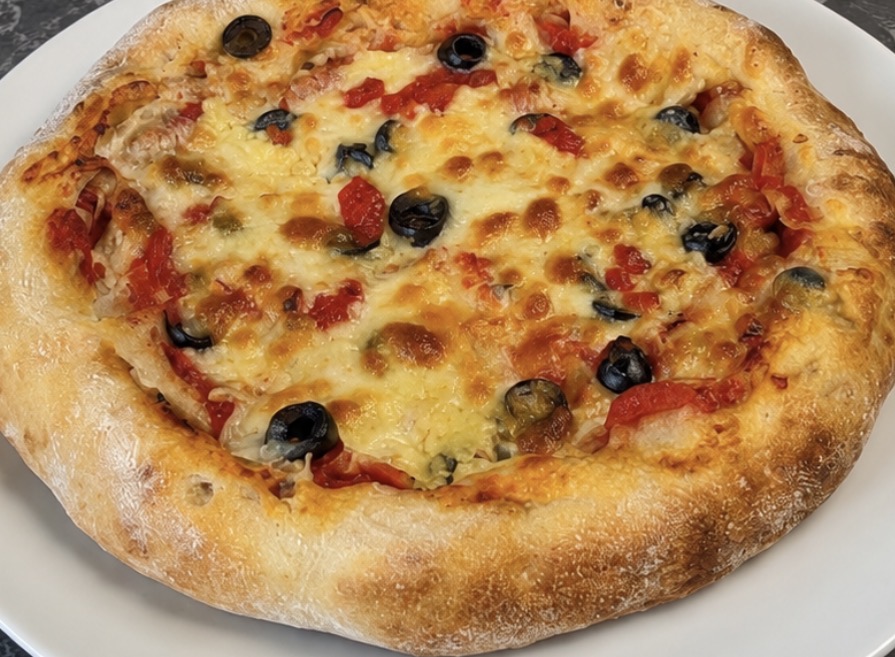
The pizza in the photo has the qualities many home cooks look for: a beautifully puffed crust, golden edges, melted cheese, colorful toppings, and a soft, airy interior. The secret is a long-fermented pizza dough. Instead of rushing the dough through a short rise, this method allows it to rest slowly, developing better flavor, texture, and aroma.
This recipe is perfect for making several individual pizzas at once. The dough can be prepared ahead of time, portioned into containers, and stored in the refrigerator until you’re ready to bake. A hot oven then transforms the dough into a rustic homemade pizza with a crisp bottom and wonderfully chewy crust.
Ingredients
For the pizza dough
- 1 kg (8 cups) bread flour or strong white flour
- 700 ml (about 3 cups) lukewarm water
- 20 g fine sea salt
- 2 g instant dry yeast
- 15 ml (1 tablespoon) olive oil, optional
- Extra flour or semolina for shaping
This recipe produces approximately 6 medium-sized pizzas, depending on how large you make each dough ball.
For the topping
- 400–500 g shredded mozzarella
- 250 g tomato sauce or crushed tomatoes
- 1 red bell pepper, thinly sliced
- 1 small onion, thinly sliced
- 100–150 g black olives, sliced
- 100–150 g roasted red peppers, chopped
- 1 teaspoon dried oregano
- Fresh or dried basil
- 1–2 tablespoons olive oil
- Salt and freshly ground black pepper
You can change the toppings according to your preference. Mushrooms, cooked sausage, ham, chicken, spinach, fresh tomatoes, or other vegetables can all work beautifully.
Why Long Fermentation Makes Better Pizza
The most important feature of this recipe is the fermentation time.
When flour and water are combined, enzymes begin breaking down some of the starches and proteins in the flour. Yeast gradually consumes available sugars and produces carbon dioxide and flavorful fermentation compounds. During a slow fermentation, the dough develops a more complex taste and a lighter texture.
The long fermentation also gives the gluten structure time to develop. This helps create the characteristic pizza crust that is both stretchy and airy.
Instead of using a large amount of yeast and allowing the dough to rise quickly, this recipe uses only a small quantity of yeast. The refrigerator slows fermentation, allowing the dough to mature gradually.
The result is a dough that can produce a crust with crisp edges, a tender center, and plenty of bubbles around the rim.
Step 1: Mix the Dough
Place the flour in a large mixing bowl.
Add the instant yeast and mix briefly. Pour in most of the water and begin mixing with a wooden spoon, spatula, or your hands.
Do not worry if the dough looks rough at first. The goal at this stage is simply to hydrate the flour.
Add the remaining water gradually while mixing. Depending on your flour, you may not need every last drop. You want a soft and slightly sticky dough rather than a dry, stiff dough.
Add the salt and continue mixing.
If using olive oil, add it toward the end of mixing.
Once there are no obvious dry patches of flour, cover the bowl and allow the dough to rest for approximately 20–30 minutes.
Step 2: Develop the Gluten
After the initial rest, perform a few rounds of stretching and folding.
With slightly wet hands, grab one side of the dough, stretch it upward gently, and fold it over the center. Turn the bowl and repeat from another side.
Do this four or five times.
Cover the dough and let it rest for another 20–30 minutes.
Repeat the stretching and folding process two or three more times.
You will notice that the dough becomes smoother and stronger with each round. It should gradually change from a rough mixture into a soft, elastic dough.
You don’t need to knead it aggressively. Time and folding will do much of the work.
Step 3: Begin the First Fermentation
Cover the bowl tightly with a lid or plastic wrap.
Leave the dough at room temperature for approximately 1–2 hours. The exact time depends on the temperature of your kitchen.
You don’t necessarily want the dough to double in size at this point. You are simply giving the yeast a chance to begin working.
After this initial period, place the covered dough in the refrigerator.
Allow it to ferment slowly for 24–72 hours.
A 24-hour fermentation produces very good results, while 48 hours often gives the dough a deeper flavor and particularly pleasant texture. You can experiment with different fermentation times to discover what you prefer.
Step 4: Divide the Dough
When you’re ready to make the pizzas, remove the dough from the refrigerator.
Lightly flour your work surface.
Turn the dough out carefully. Try not to press all the air out of it.
Divide the dough into approximately six equal portions.
For medium pizzas, aim for dough balls of around 270–290 g each.
Take one portion and gently pull the edges underneath, creating a smooth, rounded ball.
Place each dough ball into a lightly oiled container with enough room for it to expand.
Cover the containers.
Allow the dough balls to rest at room temperature for approximately 2–4 hours before baking.
The dough should become noticeably softer, more relaxed, and slightly puffy.
Step 5: Prepare the Toppings
While the dough is resting, prepare your toppings.
For the tomato sauce, you don’t need anything complicated. Combine crushed tomatoes with a little salt, oregano, and olive oil. Avoid making the sauce too watery because excess moisture can make the pizza difficult to bake properly.
Slice the peppers and onions thinly.
Prepare the olives and any other toppings.
Grate the mozzarella if you’re using a block of cheese. Fresh mozzarella can also be used, but drain it thoroughly and pat it dry before putting it on the pizza.
One important rule is not to overload the pizza. A generous amount of toppings may look attractive before baking, but too many ingredients can make the center soggy.
A moderate layer of sauce, cheese, vegetables, and olives usually gives the best result.
Step 6: Heat the Oven
The oven should be extremely hot.
Preheat it to its highest practical temperature, ideally around 250–290°C (480–550°F), depending on your oven.
If you have a pizza stone or baking steel, place it in the oven while it preheats.
Allow the stone or steel to heat for at least 30–45 minutes.
If you don’t have one, use a heavy baking tray. Turn it upside down and place it in the oven while it heats. The hot surface will help the pizza bottom cook quickly.
The hotter the cooking surface, the better the crust is likely to become.
Step 7: Shape the Pizza
Take one dough ball and place it on a lightly floured surface.
Dust the top with a little flour.
Using your fingertips, gently press the dough from the center toward the edges.
Try to leave a thicker border around the outside. This untouched edge will become the airy, golden crust.
Do not use a rolling pin. Rolling aggressively can flatten the gas bubbles that developed during fermentation.
Instead, gently stretch the dough with your hands until you reach your desired size.
If the dough keeps shrinking back, leave it alone for 10–15 minutes and try again. This simply means the gluten needs more time to relax.
Step 8: Add the Toppings
Transfer the shaped dough onto parchment paper or a lightly floured pizza peel.
Spread a thin layer of tomato sauce over the surface, leaving the outer border uncovered.
Sprinkle mozzarella evenly over the sauce.
Add the sliced peppers, onions, olives, and roasted peppers.
Finish with oregano, basil, black pepper, and a small drizzle of olive oil.
Remember that less is often more. The goal is for the toppings to complement the crust rather than bury it.
Step 9: Bake
Carefully transfer the pizza onto the preheated stone, steel, or baking tray.
Bake until the crust is deeply golden and the cheese is melted and bubbling.
At very high temperatures, this may take only 5–10 minutes. In a cooler home oven, it may take closer to 10–15 minutes.
Keep an eye on the pizza during the final minutes.
The edges should puff up and develop golden-brown spots, while the bottom should be firm and lightly crisp.
If your oven has a broiler or grill function, you can use it briefly at the end to give the cheese extra browning. Watch carefully because it can burn quickly.
Step 10: Rest and Serve
Remove the pizza from the oven and let it rest for 2–3 minutes.
This short resting period allows the melted cheese to settle and makes the pizza easier to slice.
Cut into wedges and serve immediately.
The crust should have a crisp exterior with a soft, chewy interior. The long fermentation should give it a pleasant depth of flavor that is difficult to achieve with a quick dough.
Tips for Perfect Homemade Pizza
Use strong flour
Bread flour or another high-protein flour is ideal because it can absorb a relatively high amount of water and develop strong gluten.
Don’t add too much flour
A sticky dough can be intimidating, but adding excessive flour will produce a dense crust. Use just enough flour to handle the dough.
Give the dough time
Long fermentation is not about making the recipe complicated. It is about letting time improve the dough.
If possible, prepare the dough one or two days before you plan to eat the pizza.
Don’t flatten the crust
When shaping, protect the outer edge. The gas trapped inside the dough helps create the large bubbles that make the crust light and airy.
Preheat thoroughly
A hot oven is essential. Don’t put your pizza into an oven that has only been heating for a few minutes.
Don’t overload the toppings
Too much sauce, cheese, or vegetables adds moisture and weight. A lighter topping layer allows the crust to bake properly.
How to Store the Dough
The prepared dough balls can be kept refrigerated in covered containers for several days.
If you aren’t going to use them within the recommended fermentation period, you can also freeze the dough.
To freeze, place individual dough balls in airtight freezer-safe containers or bags. Freeze them before they become excessively fermented.
When ready to use, transfer a dough ball to the refrigerator and allow it to thaw slowly. Then bring it to room temperature for a couple of hours before shaping.
Easy Variations
This dough can be used for many different pizzas.
For a classic vegetable pizza, use mozzarella, tomato sauce, peppers, onions, mushrooms, and olives.
For a simple cheese pizza, use tomato sauce, mozzarella, oregano, and basil.
For a spicy version, add chili flakes and sliced spicy peppers.
For a Mediterranean-style pizza, try olives, roasted peppers, feta, red onion, and oregano.
You can also make a white pizza by skipping the tomato sauce and using mozzarella, ricotta, garlic, olive oil, and herbs.
Final Thoughts
Making homemade pizza doesn’t require complicated equipment or professional baking skills. The biggest difference comes from good dough, patience, and a very hot oven.
This long-fermented dough is especially useful if you want to prepare several pizzas at once. The individual portions can sit in containers in the refrigerator, ready to become fresh pizza whenever you’re hungry.
The finished result is a rustic pizza with a beautifully browned crust, a soft and airy interior, stretchy melted cheese, and colorful toppings. Preparing the dough ahead of time also makes pizza night much easier because most of the work has already been done.
Once you become comfortable with the basic dough, you can experiment with fermentation times, flour types, hydration levels, and toppings. Every batch can teach you something new.
For the best result, remember the simple formula: mix gently, fold patiently, ferment slowly, shape carefully, use moderate toppings, and bake as hot as your oven allows. The reward is homemade pizza with the texture and flavor of a carefully prepared artisan-style crust.